First, obtain the dowels. They are readily available at hardware stores, Wal-Mart, Hobby Lobby, and similar stores. Check around – in my community, they are much cheaper at Hobby Lobby than any other store, and they are also of better quality. Make sure that you are getting something like birch or maple – oak will not work at all. (I want to try some really exotic wood, such as ebony.) You want a fine grain. It really doesn’t matter if the dowel is straight or bowed, but it must be smooth. Run your hand down its length in both directions to determine if the grain is poking out the sides or not.
Next – remove the label, and sand the dowel. I start with 150 grit, then 200, 300, 400, 600, and I finish with 2000 grit. You can find this fine sandpaper at auto-body shops. One pack of multi-grit will last for the rest of your life, if all you use it for is knitting needles, so don’t be put off by the cost.
Now, you are ready to start.
1 - Cut the dowels to length. This is another reason why I make my own – I find that the store bought ones are too short. I make my needles about 6 inches long. If you are cutting with a razor blade, roll the dowel under the razor’s edge, making a groove all the way around the needle, then snap it to break it.
2 – Make a point at one end. I use a chisel, but you can sand it to a pointy shape, or you can use an Xacto knife. A pencil sharpener will give a really bad shape, but you can use the pencil sharpener to remove the bulk of the wood, and then come back with a knife or sandpaper to elongate the point.
3 – Drill a hole in the other end. Drill it as deeply as you can manage. It’s perfectly OK if you can't go straight, and the hole pokes out of the side of the needle. No problem.
4 – Shape the end that you just drilled into a point. Don't get too close to the hole - you can shape this later.
5 – Sand both points through the different sandpapers, starting with the 300 or so.
6 – Cut the filament to the proper length.
7 – Dip the end of the filament into the adhesive, and shove it into the hole. Try to get some adhesive down in there, too.
8 – Allow to dry. If you use Household Adhesive, you are ready to proceed in about 10 minutes.
9 – Pare off the excess adhesive with a razor blade or Xacto knife.
10 – Wrap the join in Plumber’s Tape. This tape has no stickiness - it sticks by static cling. You will need to pull it and stretch it and smooth it out. It works like a charm.
11 – You're done, so knit.
These wooden needles are a joy to use. They get soooooooo smooth with use. I made a pair the other day out of chopsticks, instead of wooden dowels. These chopsticks are of some sort of bamboo, or other grass. Usually, chopsticks are square for most of their length, but these are more-or-less oval, and they worked great. In no time at all, they were as smooth as they could be. I’m going to really like knitting with these. Here’s a pic – not that these look any different, in the flash of the camera.

Here (below) you can see a REALLY long needle – I made this while I was knitting the Red Tent Blanket, and I was anxious to see how the spiral was coming along.
 I made this super-long needle so that periodically, I would knit off of my regular needle and knit onto this long one, and spread the blanket out flat, and check my progress. This needle is about 90 inches long!!! No, I don’t use it very often. In fact, I don’t think I’ve ever used it since.
 This is the length I use most often – between 50 and 60 inches long. It’s the perfect length for knitting two items at once, via the magic loop. Here you can see a fuzzy hat – destined for the chemo department of the hospital – on a 50 inch long needle. I'm knitting in the round with the Magic Loop method, which is why there is a loop sticking out of the right side of the hat. You can also catch a glimpse of homeschooling in progress, lol, as I interrupted one of my children for help with the photo. Bad mama. lol.
Another of my fave length needles, in the nude.
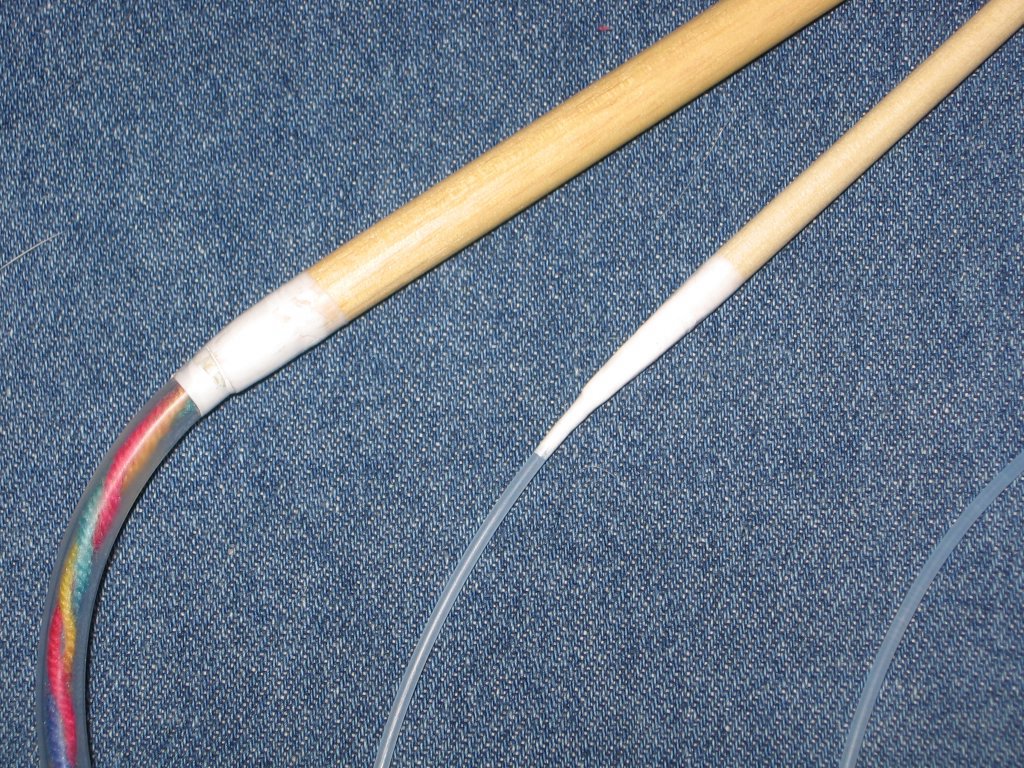 This pic shows the two different cords I’ve used – Weed Whacker Filament, and aquarium tubing. The tubing is on a needle which is about a size 13. The difference in diameter between the large needle and the filament is a bother, so I thought it was a brilliant idea to use aquarium tubing! Well, with the yarn run through the tube, it’s pretty and all, but not a good idea. The tubing is so “grabby” that the grabbiness is much more bothersome than is the difference in diameter between the cord and the needle. The tubing is very flexible, however.
 With use, the plumber’s tape gets all ratty, as you can see here, but it makes no difference at all. You would think that the rags and tags would be a problem, but they really aren’t. Notice the upper needle – if you look carefully, you can see that the drilled hole came poking out of the side. I “packed” this hole with the adhesive, and when it dried, I shaped it with an Xacto knife, and all is well. I’ve knitted a million miles with this particular needle.
 My home-made dpns are very lonesome these days. I rarely use any of them. Notice that the colorful ones were pick-up-sticks, in a former life. I bought them in a nifty little wooden box at the dollar store. They are bamboo, and a perfect size 1. How I hate dpns!!! I feel like they are all going to poke me in the eye. I clearly have a deep-seated fear of being poked in the eye by my crafting equipment! I think it stems from the various experiences I’ve had of actually getting poked in the eye – not fun.


5 comments:
This is great!! I never thought of wooden pick-up sticks for dpns!! And that is a size I use alot for socks. Ingenius!!
- You go homeschooling, Mama!!
Oops!! Forgot to ask: Have you found a source for dowels in the other woods (oak, amber, not to mention ebony or birch)??
Wow, what a great idea! Thanks for the tutorial. =)
Never heard of plumber's tape, so it's hard to imagine how it stays in place. Altogether fascinating. You are amazing--thank you for sharing this!
--Beth
Plumbers tape is also called "teflon" tape. Very thin, very slick, and yes, it sticks to itself very well.
Post a Comment