This spiral blanket project is the perfect thing to have on hand for times when completely mindless knitting is needed. I'm sorry that I'm near the end of this project. I'll miss it!
But, near the end, I am. It's time to knit on an edging - my favorite way to end a from-the-center-out blanket. What I hate is that when I've gone all the way around the blanket, and it's time to sew up the ending to the beginning, the resulting seam is so noticeable. I really don't want a seam there, I want to be able to kitchener it together, invisibly. I need a provisional cast on, in order that I will have "live" stitches to kitchener. Is "kitchener" a verb?

So… I decided to try my favorite provisional cast on, and it works perfectly.
Here goes!


And, I'll knit backwards, or actually, *purl* backwards. When knitting on an edging, it REALLY makes it a million billion times easier if you just apply yourself to the task of learning to knit backwards. Same goes for entrelac. Just start a swatch and learn it. Learn to knit backwards, and learn how to purl backwards. You'll be so much happier, trust me!
This edging is a garter stitch lace pattern. By the way, the lace pattern doesn't show up at all on this variegated yarn, but so what, I'm doing it anyway, lol.
What I need to do, in order to end up with a garter stitch lace, it to purl from left to right, and knit from right to left, with the right side of the fabric facing me at all times, right?
Right.


I could put the provisional cast on stitches onto a stitch holder, but why bother? I'll just leave them on the cable.
Has anyone noticed how many of these pictures feature the backside of my dogs? Silly dogs. I'm sitting on my patio, enjoying the lovely weather, and the Virginia Creeper is blooming, which is attracting bees. The silly dogs are snapping at the bees. Sigh.
Anyway, back to knitting. I'll continue the edging, all the way around the blanket, and when I get back to the starting place, I'll kitchener the ends together and all will be right in the world. If I were smarter, then I would have purled backwards on that first row, as if it had yarn overs and so forth, but since I was sort of making it up on the fly, I sort of didn't think of that little step until this very moment. *blush* The NEXT time I knit on a lace edging, I'll keep it in mind, OK? As it stands right now, there will be one row which features no lace pattern. Since the edging will have something like 700 rows, I'm hoping that no one will notice. I'll know that there is a mistake, but since my mind is like a sieve, I'll forget it ever happened. If anyone else notices, then I hope that they are too polite to mention it.
 This is the pattern which I am using. It is a modification of this one, http://www.knitting-and.com/homework/grandmothers-edging.htm This is one of the best knitting websites on the entire internet. Thank you SO MUCH, Sarah Bradberry! You taught me to knit, and you continue to inspire me!!! THANKS!!!
Here is how to knit the edging onto the body of the blanket. In this way, you are effectively casting off the blanket's stitches while knitting on the edge. I think that this is completely brilliant, and just ANOTHER of the things I've learned from Sarah.
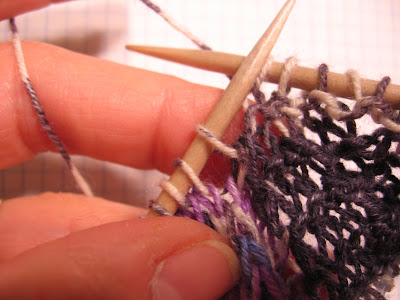
 In the above photo, you see the second-to-last edging stitch has been knitted, and the last one is waiting... It's going to be knitted together with the first stitch of the body of the blanket.
The first stitch of the body of the blanket is emerging from a purple stitch - - it's the second-from-the-top, on the left hand needle ... do you see it? The last stitch of the edging is emerging from a gray stitch - it's the one on the top of the left hand needle... See it?
 Here, I'm actually knitting the two together. It's just like any other k2tog. The white stitch (on the bottom of the two) is from the body of the blanket, and the grey one (on the top) is from the edging.
 Done. Now, slip this stitch back onto the left hand needle, and purl backwards across the row!
I've tried different ways of knitting the edging onto the blanket - knitting two together through the back loops - k2tog on one row, and then, p2tog on the next, and alternating the two - or p2tog all the way through - but I return to just a simple k2tog when I knit on a edging. I urge you to experiment, however, and see how you like it best. I'll stick with my old friend, k2tog.
When I get my camera in hand, I start snapping pictures right and left....
I thought that you'd like to see the zipper pulls on my knitting backpack.


