National Alpaca Farm Day


This was my second time participating in National Alpaca Farm Day, and once again, I had a wonderful time. There was so much to do! So many activities! So much to see!

Here are some highlights -


First of all,
Phil and Allie welcomed everyone to their farm in their friendly way.

Phil spoke to visitors about how to raise alpacas, and taught folks about how to select the right alpacas when buying. Phil and Allie have lots of alpacas for sale - if you are interested in buying, you should contact them at their web page, Eyedazzler Alpacas - gosh, they have some beautiful animals for sale! Click here for more information about sale animals.

One of the day's activities was that visitors could have their photo taken with an alpaca, and could lead the alpaca on halter. My daughter, Emma, was the official alpaca wrangler, and she had a great time.This was loads of fun for all who participated.

There were also many demonstrations -
Pat demonstrated wet-felting alpaca fibers, and...
Karin demonstrated needle felting. She also let some folks help her out - just take a look at this enthusiastic young needle felter.

There were other demonstrations, too.

Julie and Sharron demonstrated spinning on the wheel,
Men seemed particularly interested in the spinning wheels. Julie does a good job explaining what all of the parts do.

Julie and Sharron also taught visitors how to spin, here you can see Sharron helping a student, and Julie is giving her some pointers, too.

I demonstrated drop spindling,
and I taught quite a few students, too. I LOVE the look of concentration on the students' faces!

As an aside - for all of you spinning teachers - Allie has some alpaca roving which was a side-by-side mixture of black and white. If you enlarge the photo below, you can see it wrapped around my arm. This day's spinning students learned amazingly quickly, and I an certain that it is because of this "skunk stripe" roving - the students could easily see the twist, and understand the concept of twist and of keeping it out of the drafting zone.

The speed at which these students picked up spinning was completely amazing! I'll never teach spinning without it.
I tried to teach this alpaca how to spin, and while she was very interested, she didn't really take to this new skill. Alpacas are such curious little creatures, it appears that they hang on your every word. It is very satisfying.

By the way, how did my baby daughter end up so tall?

I also ran the "till" as all of the items you see on the tables and shelves, as well as all of the spinning wheels, were for sale. We sold roving, fleeces, dyes, spinning wheels (Ashford, Louet, Schacht and Majacraft), handknitted items, knitting and crochet kits (coffee cup cuffs, cell phone holders, scarves), and balls of yarn. If you are interested in any of it, email me at thomases2000@yahoo.com and I'll send more info.

But, that's not all -
Peggy had a dye studio set up in one of the alpaca pens,
and demonstrated dyeing -
Peggy teaches precision dyeing methods - here are two of her Triads. This is a very precise, very accurate method of mixing dyes, and by learning how to do it, you can match any color you want to - you know, sort of like the guy does down at the paint store. You can see a better picture of one of Peggy's triads here, Triad Photo.

Peggy (in the black shirt), discussing her methods of dyeing with one of the Farm Day Visitors. If you want more info, email me, and I'll put you in touch with Peggy.


WAIT! I'm not done!

All visitors to farm day were treated to a lovely lunch of Aji de Gallina - a Peruvian chicken stew. Oh my goodness, this stuff was Completely Yummy. As you can see, I cleaned my plate!


To top it all off, Jack the barn cat did his part -He hung around, looking handsome,and he entertained the younguns. He is the friendliest cat!


BUT - the best of all - Take a look at Homeschooling in Action - -


Homeschooling at its very finest - go to an Alpaca farm for a day, thinking that you are going to wrangle alpacas, and end up learning about dye chemistry, proper use of various measuring devices, and laboratory safety. I love it when this happens.

Life just doesn't get any better.
Thanks Peggy.

I love Autumn!

A small group meets every Wednesday afternoon for knitting, spinning, and mostly, laughing. Since the weather is so nice, we met out on the Riverwalk today. It was beautiful! This is my most favorite time of year. I love Autumn!

From left to right - Erin, Dana, Diana, Juanita

I wasn't paying attention, and I only got a photo of Juanita from the back? Hmmm... must do something about this. You can see the river right behind Dana. I tell you, this is the best thing to happen to this town in a long time - the HARP

So, if you are ever in my neck of the woods, join us! Email me.

This group began as a spinning group, and Erin and I break out our drop spindles at every meeting. Here's Erin,
and here I am, spinning away on this lovely day.

On my spindle is some of that wonderful Suffolk from my friend's barn - many other projects pushed this project to the sidelines, but now, I'm back to it and an nearly done! I've spun the wool using Tammy Rizzo's Ply on the fly technique, and I've spun from rolags, which has made a lovely, boingy, springy, wonderful yarn. I'm knitting a pair of socks for Annette's Mother in Law, using a heavily modified version of Nancy Bush's, Chalet Socks, which is from the book, Folk Socks. I should have them done, soon.

They are coming out good enough, I guess - I'm not thrilled with one of my decisions - to knit the traveling stitches "regular" instead of "twisted" - my reasoning (at the time of the decision, sigh) was that the twisted stitches would render the sock less stretchy, which is true, but it also makes the design less defined. Anyway, they should be done soon, so you can see what I mean.

Also, I used Cat Bordhi's idea for the construction of the toe up sock. Check this out - Houdini Socks - (note the pattern download) - Oh My Gosh, I may never make socks any other way again! I love it! I keep telling you, I'm surrounded by geniuses on all sides! The woman knits an afterthought LEG, rather than an afterthought Heel. How terribly smart! More later....

Get out there and knit/spin in public!

We Won!

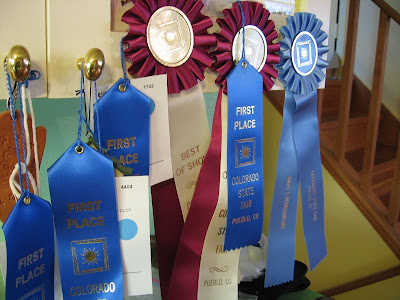
Grace and I mopped up at the Colorado State Fair! Check out our pretty ribbons –


Grace won first place and best of show for her skein (click for blog entry about it)


and first place, best of show and superintendent’s choice for her shawl


Notice how her beautiful shawl is oh so casually thrown onto the floor (the dirty floor, ahem!) in such a way that the viewer has no idea as to its shape or size. Sigh.

The nice thing about this contest is that you win pretty ribbons *and* money. Each first place win comes with $15, cash. Well, not exactly cash, they’ll mail out checks next week. So, Grace is $30 richer!

I didn’t do too badly, either. I won first place for my humongous knitted doiley, which you might notice is folded into a lump in order to be displayed,

and I won first place for my skein of bicycle spindle wheel yarn


Yesterday, I collected our items and our ribbons and I made a delightful discovery – my skein also won a non-ribboned prize from the Pikes Peak Weaver’s Guild – they awarded me an additional $25! How cool is that?

It’s fun to take home pretty ribbons.

Family Obsessions

I'm not the only member of this family with obsessions...
My 18yo son, Sam, has a few of his own. Origami is one of them. Teeny Tiny Origami is a new one. You should see the size of the hands which folded these tiny birds. (They are HUGE!)

My New Wheel!

This added Nov 6, 2011 - you might like to look at my updated instructions here.

Like I keep trying to tell you, I'm surrounded by geniuses! I stumbled upon this blog entry, Knitting, With Dogs Spinning Wheel, and it really captured my imagination. Another picture. Genius!
Soooo.....

Check out my new wheel!


It took no time at all, and best of all, it cost nothing at all. Ahhhh... the pleasures of a junk-filled garage!


My first whatchamacallit - flier? spindle head? The thing which holds the spindle - the first one that I made was made out of brio mec parts. I just slapped something together so that I could determine whether or not this was a technique which I liked well enough to pursue. I loved it from the very first!

Since the holes in the brio mec parts are much larger than my "spindle" (a US size 10 knitting needle), it wobbled terribly, so made my spindle-holder-#2 out of a 2x4 piece of lumber. Once again, I just slapped something together out of a scrap piece of lumber, just to see how I liked the outcome.


I *really* like this version, and I have a nice piece of cedar which I'll use for other spindle heads. This particular piece of lumber has served as practice for several other projects - disregard the hole which is below the spindle - it was just a practice for some other project - there are other holes and cuts on the other side. I didn't care, as this was just a trial run, you know, swatching with waste yarn, heh heh heh.

As an aside, it seems that Brio is no longer making Brio Mec? I searched their website and couldn't find anything? Huh? How am I going to spin? Click here, and here, and here for other Brio Mec Spinning tools. Better go to ebay and stock up?

The 2x4 version is quite sturdy, and once I greased it with some Vaseline, pretty quiet, too. My only complaint is that the spindle is in there and can't be removed if I am in the middle of a spinning project. It can be removed when the yarn is removed, but not while the yarn is on the spindle.

I put a bit of innertube in there to increase the traction of the string, but I'm not sure that it makes much of a difference.


Look! It really works! I'm soooooo happy!


Here is my prototype #1, from the back. The bike wheel is screwed into a scrap piece of metal, then clamped onto an old spice rack, then that is clamped to a saw horse. The spindle head is clamped onto a door. Since I really love this type of wheel, I'm going to build a frame for it, and have it sized to sit on the table top.


This is what I am using for a band - it's quite stretchy and grippy and works great.


I used a yogurt lid as my "whorl" and I don't like it one bit. My second whorl is a mayonnaise jar lid and it works perfectly.


Here is set-up number 2 - - I moved the spindle further away from the wheel for two reasons - first -it makes the band grip onto the spindle better, as the angle of the band is more acute and therefore, grabs more of the spindle shaft, and second - I can spin a longer bit before I have to wind on. I can probably spin a length of about 6 feet before I run out of arm, and have to wind on. (I had my daughters hold up a sheet because the junky garage is rather distracting. Holding up a sheet is *much* easier than cleaning it up. grin)


Here you can see spindle head number 2. It is a piece of 1x plank with a bit mortised out.


I put all of my screws in a straight line, without drilling pilot holes, something that I know better than to do, so my board cracked. Oh well, once again, this is just a prototype. My finished product will be made out of a nice piece of maple which I dug out of the bottom of one of my boxes of wood-stash. It's going to be nice.

Anyway, this version features soda-pop-bottle-plastic straps - click for a larger picture, and maybe you can see that there are two straps on each side. The first strap is to surround the spindle in plastic so that it will turn without rubbing on the wood. The second strap is to hold the whole thing still - sort of like a bushing, sort of. It works great and is less noisy than the 2x4 version. Also, I would be able to switch out spindles even if they are full. I like this idea, especially since I never start a spinning project and carry it to completion. No, not me, I like to have umpteen spindles going at once. This is how I can accomplish this with my new wheel - have changeable spindles.

Spindle holder #3 is going to feature leather straps in a similar construction. I'm going to drill holes through and through, and thread the leather through the holes, and in this way, the strap will be adjustable to the diameter of the spindle, but so far, it's still in my head and not yet on my spinning wheel, lol. Spindle holder #3 is also going to be a tiny bit taller. Each of the prototypes have gotten progressively taller, and I think that having the spindle at about the same height as the axle of the wheel will be just about right. I think that I'm going to experiment with having the wheel just a tad bit lower, too.


This shows how I wedged the mayo lid onto the knitting needle, using a bit of rubber band to hold it still. It works great. I drilled the hole into the mayo lid with a needle point drill bit. I just aimed the needle into the little nipple which is in the middle of the underside of the mayo lid. Perfectly centered! Easy! Yay!


The mayo lid works perfectly. The zip ties on the spindle are to hold the band in place and to keep the spindle centered how I like it. They aren't completely necessary because if the wheel is lined up, then the whole shebang should stay aligned, but focus on the word, "should" and keep in mind that...well... things get a little crooked and life happens, lol. The zip ties really help.

I just love this type of wheel! Spinning with it is a lot like dancing.

Stay tuned for future improvements!

This added on October 15, 2008 - see the latest improvements to my Bicycle Wheel Spinning Contraption here - - Blog Post, "Odds and Ends"

Please, if you build your own, send me an email with a link to your pix? I'd love to see your inventions! My email is in my profile. Please, put something indicative in your subject line. If your subject line says, "hi," then I'm pretty certain to delete it. Thanks so much!
.
.
.