


Once I completed my green socks, socknitting fever was in full swing. I've had this ball of Trekking yarn in my stash for years, and now was the time for it to become a pair of socks. I planned and cast on this pair of socks on a recent family car-trip to Taos, hence the name.
I've had a fondness for traveling stitches ever since knitting a pair of socks for Anastasia. I don't like the look of traveling stitches which are twisted - I don't know why - I just really don't. Most traveling stitch patterns ask you to twist the stitches - experiment with them twisted and untwisted and see how you like them the best.
I cast on using Cat Bordhi's Whirlpool Cast On - and used her SideStream Construction for the general idea of the sock. Both methods can be found in her book, New Pathways for Sock Knitters
The Whirlpool Cast on is perfect. I doubt if I'll ever use another cast on - ever. It's quick, easy, intuitive, and eliminates those hated "ears." You can adjust your rate of increase so that your sock's toe will match the shape of your own toes. I love love LOVE it. In fact, I'm probably going to use it for any center-out cast on that comes my way - I'm thinking how wonderful it would be to have a from-the-center-out shawl which begins this way, instead of with that oh too cute little belly button.
Cat Bordhi is such a genius. Her amazingly creative solutions to knitting problems just leave me speechless. This book took my breath away.
Anyway, I settled on the SideStream construction. I was a little panicky at one point because it looked like there was simply NO WAY that this was going to work. The only thing that kept me going was that Cat had never let me down, and so I forged ahead. You know what? It worked! It worked soooooo beautifully!
I started the "pattern" so that, at the first, it was running up the outside of the toe. If I had used the more standard sock construction, this pattern would have ended up running up the outside of the sock. However, since I was using Sidestream Construction, it gently shifted the pattern so that now, it runs up the exact center of the sock, right up my shinbone.
 I was able to put another pattern panel in the wedge created by the Sidestream, and voila, this pattern runs up the exact center of the outside of the sock. This was one of those Happy Accidents. I thought that it would end up more to the center, but no, it couldn't have been any more perfectly placed if I had planned it. In fact, I'm done planning. From now on, I'm going to use the "Choose Your Own Adventure" method, as it's fun and seems to work very well, heh heh heh.
 Do you have any idea how hard it is to take pictures of socks which are on your feet? I can't do it very well, as you can plainly see.
I played with some graph paper and decided on this simple waving pattern. This one pattern is the only one used - up the sides of each sock, the waving pattern appears by itself. Up the front of the socks, the waving pattern is represented twice - on one sock the patterns are balanced so that each goes out and returns to the center at the same time. On the other sock, one curve follows the other so that it sort of looks like DNA, in a way, kinda.
I used the starred options for the fronts of the socks -
 The plain wave is seen on the far right.
The braids up the back of the sock - I used one pattern for one sock, the other pattern for the other sock. It made me tired, lol.
 For some reason, this one was hard for me, and for the first 20+ rows I just kept screwing up, and a big problem is that I didn't notice that I screwed up until long after I had cast off. I know, I'm a special breed of stupid.
Anyway, water under the bridge. It's a good knitter who knows how to repair mistakes, and repairing mistakes doesn't always mean ripping out. In my little corner of knit-dom, it rarely means ripping out. It means repairing.
It was so simple to fix - I simply embroidered over the mistakes and voila - perfection!
Here you can see that I completely forgot what I was doing, and there's a gap in the braid.

 No problem, just hook the new to the old.
Here is a bigger problem - I crossed the braid incorrectly, twice in a row. The "fix" is shown in the collage - click for big. You'll be able to see how I fixed it.
 It's really easy to do - just a chain embroidery stitch.
I also bought some new sock blockers which are great for taking photos of socks. Here are a few photos -
Detail of the pattern on the left sock- 
Detail of the right sock-

outsides-

insides-

whirlpool toe -  this is a fantastic toe - look ma, no ears! (I hate squared-off toes and those little ear flaps.)
Nice and round. You can adjust how round by adjusting the number of "wedges" and therefore, the number of increases . If you want a more narrow, pointy toe, use fewer wedges. If you want a wide, round toe, use more wedges. I used 6 and placed my increases every other row. I really like this toe, and doubt that I'll ever use another.
 this is a fantastic toe - look ma, no ears! (I hate squared-off toes and those little ear flaps.)
Nice and round. You can adjust how round by adjusting the number of "wedges" and therefore, the number of increases . If you want a more narrow, pointy toe, use fewer wedges. If you want a wide, round toe, use more wedges. I used 6 and placed my increases every other row. I really like this toe, and doubt that I'll ever use another.

detail of the braid up the back of the sock-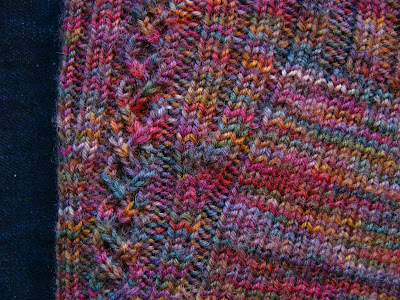

I had fun with these patterns! I had fun knitting these socks. Check out Cat's new book - I tell ya, the woman is a GENIUS!!!
Details:
Trekking XXL yarn- one ball
0 US needles
Created - April, 2009.
Toe up socks, whirlpool toe, sidestream construction, two at a time, magic loop - one knit picks circular, 24 inch (I think it is 24 inches long - I really hate to use long needles.)
Ideas from Cat Bordhi, New Pathways for Sock Knitters
Toe up socks, whirlpool toe, sidestream construction, two at a time, magic loop - one knit picks circular, 24 inch (I think it is 24 inches long - I really hate to use long needles.)
Ideas from Cat Bordhi, New Pathways for Sock Knitters


7 comments:
Those are truly elegant socks! And you took such pains with getting them exactly right. Wonderful job!
Your socks came out wonderfully -- yippee for planned serendipity!! Great write-up, too, on fixing mis-crossed stitches. :-)
Those are beautiful socks. Congratulations!
Beauty socks!
I love your socks -- the waves look like DNA to me!! I can't stop reading your blog because I love all the tutorials and detailed photos - you do a great job!!
the yarn is lovely. the pattern is great. I see double stranded DNA when I look at it, too. just wonderful. your photos have great detail as well as your text. Loved reading it and seeing the socks. thanks for sharing.
Brilliant socks and really informative post. Thank you muchly,I shall come back to it.
Post a Comment