Sparkles!


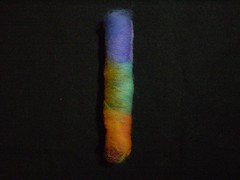
My dear friend, Allie Neas, one of the owners of Eye Dazzler Alpacas, gave me two ounces of sparkly alpaca roving "to play with." She and I met at a yarn shop (actually, as it happens, we crashed a birthday party and got invited to share in their lunch - it's all in the timing! Thanks Karen, for allowing us to share in your wonderful party-potluck! Visit Karen at her shop, Colorado Fiber Arts, and wish her a belated Happy Birthday!), and I spun some of it on my handspindle, and it was just too gorgeous for words. Oh, the sparkle! It brings out the magpie in me.

As usual, I spun this very fine and very tightly spun because, well, I have my flaws. So, I casually mentioned that I just bet that I could spin this lovely roving into something a little more... useable... if I only had use of a spinning wheel.... so Allie loaned hers to me for the weekend. Now, this was very clever of me, don't you think?

This is what came home with me - an easier-to-use spinning wheel surely doesn't exist. I was able to set it up and get it running in no time at all. It's a Majacraft Suzie Pro Alpaca, and it's a wonderful machine! I just couldn't get over how easy and intuitive it was to set up and run. I especially like that it has a large, triangular opening for the yarn to pass through, rather than a little tube, like I've seen on other machines.

I spun a little while on a variety of alpacas in my stash - you can see my little pile there, in the lower left of the photo, then I sat down to spin the sparkley stuff. I spun all of the two ounces in just a few hours. This is amazing! I think that it came out very nice, with allowances for this being my first time on a wheel and all. I attempted to spin a thicker, soft, lofty yarn, and I like it!

Next, to prove that I did actually spin something useful, I sat down to knit some Mrs. Beeton's. The only problem is that I when I wanted to cast on, I was away from the house and away from my computer (Imagine that!) so I didn't have the pattern, so I came up with an approximation. Here's what I did - I worked a gauge swatch, and decided that 7 sets of k2p2 would make a nice size, so my "base number" is 28 stitches. I cast on three times this many, and knit stockinette for about one inch, then knit three together (slip 2 as if to knit, knit one, pass the two slipped stitches over) all the way around. Knit the cuff in k2p2 for approx 4.5 to 5 inches, or whatever length you like. Easy!

I finished these wristies in a nice little coffee shop on the Plaza in Taos. We returned from our trip a week ago, and until this morning, I hadn't seen my mitts, or my socks (future post) and I was beginning to think that I had left them at that nice little coffee shop on the Plaza in Taos! Oh, I was peeved with myself! However, as you can see, they returned (were in a child's room, aka "black hole"), and all is right in the world.

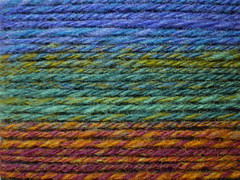
Anyway, back to the sparkly alpaca. This stuff spun just exactly like plain alpaca, which came as a complete surprise to me. I would have thought that the sparkle stuff was somehow stiff and non-compliant, and that it wouldn't stick to the fibers and draft out, but I was wrong. It drafted just fine, like it was alpaca fiber. This was nice. It was a very pleasurable spinning experience, watching the sparkle and feeling the alpaca, leave my hand and become yarn. I just love spinning!

Now, photographing it was another story. It's impossible to capture the sparkle! Very frustrating. However, I have a genius husband - I'm telling y'all - I'm surround, on all sides, by geniuses! He suggested that I underexpose the shot, and it works! Well, it works enough to demonstrate that sparkle is there - you have to *see* the sparkle with your own eyes in order to really appreciate it. Here is the skein, exposed as the camera wants to expose it.


Here is the skein, vastly underexposed. See? (make it bigger - you'll see it better)

So, like I said, I found the wristies just a few minutes ago, and asked my darling daughter to model them for me. It's very windy outside right now, so I thought that if we stood just inside the storm door, I'd have good light for the photo - (the "lump" on the uppermost wrist is G's wristwatch.) (Click the photo for a larger view)The dog got all excited because she KNOWS when photos are being taken and she wants to be in all photos, so here she is, wiggling and saying, "Pick me up pick me up pick me up."


When Grace didn't pick her up, she simply-
leaped into Grace's arms, silly dog. (Grace is wearing her nice satin jacket for this photo shoot - and her pajama pants. You aren't supposed to know about the pajama pants, but I couldn't resist Dixie and her cuteness, so don't tell Grace, OK? Thanks.)

So, here is my photo shoot, with Dixie. Aren't they cute? Yes, I mean Grace, Dixie *and* the wristies!

Then, I thought about taking an underexposed photo in order to show off the shine, so I thought that maybe over by the piano would work. Take a look at what this sparkly alpaca does! What the Red Shoes does for your feet, the sparkly alpaca does for your hands! It makes you play the piano like a maniac!


Here is a shot of the rest of the ball of yarn, and the wristies. There's plenty enough left to make another pair! So, one ounce would have easily completed this project. (in this photo, they don't look like they are the same size, I suddenly realized. They are just about the exact same size. I don't quite know why this photo came out so wonky.)

Here is another feeble attempt at photographing the sparkle. I'm telling you, this is the sparkiest yarn you could ever imagine, but you'll just have to believe me - I simply can't capture it in a photo.

Oh, I almost forgot! While in Taos, we visited a number of gem and rock shops - my son is taking a jewelry-making class and needed some stones for setting, and I found and fell in love with "Goldstone," a man-made stone which is sparkly. After a while, it dawned on me - it looks just like this alpaca!Goldstone doesn't photograph any better than sparkly alpaca does. Also, my camera does weird things with red - these two are closer to the same color in real life, but the photo makes them look quite different. Anyway, both are sparkly and pretty and I like them.

If you want some sparkly alpaca roving of your very own, then please contact Allie at EyeDazzlerAlpacas, and she'll fix you right up.

Cheers!
Rosemary
;
;l

COLORFUL pseudo rolags!


Take a look at this!!!
Knittermobile (Ravelry) took one look at the pseudo rolag post and RAN with it! She's done some amazing work with blending colors - take a look -

Originally uploaded by Knittermobile


This is an example of one of her pseudo rolags, and here is the resultant yarn -

Originally uploaded by Knittermobile


As I've said numerous times before - I'm surrounded by Geniuses!!! 


Knittermobile, you are a Genius!!!


Oh my goodness gracious, take a look at those colors and how they are blended! I immediately placed orders with my favorite etsy sellers for some colorful roving, because I want to play, too.


Be sure to click the photos - or just go straight to Knittermobile's flickr account, and you can find more pictures of her colorblending with pseudorolags. Stunning, simply stunning. Also, such beautiful photographs - I'll have to ask her for her secret.


In the past few days, I've been playing around in my stash box - I'd like to spin for a sweater.  I saw the most wonderful sweater on a lady at a fiber show last May - it is Moonlight, by Rowan. Whooee, that's not a good picture.   If you are on Ravelry, then look at the project pages there - it's a great sweater!


I have gobs of perfectly lovely coopsworth locks, so I started playing. I didn't like spinning this particular fiber from the fold, so I decided to try making pseudo rolags - well, this stuff is soooo puffy and bouncy, that it wouldn't cooperate.   It wants to spin from a cloud, but I can't quite figure out how I'm going to accomplish that and ply on the fly...

...so, I've included a few photos to demonstrate the work-around.


Basically, I forced it to comply by using a comb to wrangle it around a size 15 knitting needle.

(non-coopsworth hair furnished by my daughter's cat, Jingles. She likes to sleep on my brushing cloth, the little dear.)

I used the comb to fold the fiber over the needle, then I held the comb in place while I began to roll the needle.

Then, I rolled and rolled -


and it continued to be puffy and bouncy and not hold together into a rolag form, but instead, it fell all to pieces.

So I pressed down on it with my hands - pretty firmly, actually.


and I rolled and rolled until it compacted into a surprisingly hard, tight, and dense little bundle.

Then, amazingly, it spun like an absolute dream..... ahhhhhh..... I thought that I had ruined it by compressing it so, but actually, it spun quite easily. The pseudo rolag held together really well, and even though it was so dense, it still drafted like a dream. Huh. Always a surprise. Also, it was very easy to handle - before I figured out this work-around, the rolags always fell apart and were very difficult for me to work with. Another nice thing is that there is LOADS of fiber in that dense little bundle, so I was able to spin a long long strand out of one pseudo rolag. I like this aspect, too.

I was able to get a nice, even spin, and I did the ply on the fly magic and... ahhhhh.... it's really nice yarn! I think that it'll be perfect for a hardwearing, jeans-and-turtleneck, everyday, knock-around, sweater. It's a great color, too. It looks white in the photos, but actually it's a very light grey with strands of jet-black hairs - not in great density - but I really like these little strands of black.

I think that this is the wool I'm going to use for my project. Now, to contact the seller to see if she has any more left.

So, if you want to use a fiber with some fight to it, here is how to force it to comply.
;
;

Pseudo-rolags

l
l


On one of my zillion yahoo-spinning lists, we recently discussed the topic of making rolags without using handcards. I never use handcards, but I like to use rolags, and here's how I do it -

NOTE - I'm fully aware that what I make are not the same as "real" rolags. I'm OK with this. These pseudorolags work just fine, and I love to use them. In fact, this is what I used to spin Anastasia's Socks - which was a very fun spinning project.

OK, so - here's how I do it - - I flick with a kitten brush - very cheap at the pet store -


You can also make pseudorolags out of roving - it's almost exactly like the process above, only without the flicking. Simply pull a staple-length bit of roving (OK, so it's top - let's not have this argument too, heh heh heh) and lay it on the fabric. Pull off another bit, lay it down and etc. The pieces which you are pulling off are whispy, thin bits, not great big fat hunks. It makes a lovely spinning preparation.

If handcards give you problems, but you would still like to spin from a nice, lofty, springy, easy-to-draft rolag, then - here ya go! Have fun!
l
l

Boucle!

.
.
Last month, my good friend, Peggy, came down from the big city to my humble little burg to teach us how to spin boucle! The class was aimed towards my friends, the Spinning Wheel Spinners, but Peggy made a special attempt to teach me, the Spindle Spinner, how to spin Boucle, too.

Let me tell you, there's hardly anything more exciting than watching little boucles pop up on your yarn!!!

Let me begin at the beginning. This class was sponsored by my good friend, Allie, from EyeDazzler Alpacas up in Westcliffe. Since the class was on January 31, Allie was afraid that maybe there would be snow, and it can be hard to get to Westcliffe in the snow, so Allie held the class at our local public library. This turned out to be an exceptionally nice place to have a Spin In.

We spun Mohair into singles. I bought some Mohair last summer, so I had this nice supply of blue-green curly hairy fiber. Let me tell you - this stuff is the polar opposite of alpaca, my favorite spinning fiber. There's a reason why they call it MoHAIR.

Hair. You are spinning Hair. Not my most favorite spindling experience. But, I'm willing to learn something new.

First - we made "brushed mohair." (as always, click on the photo to enlarge it.)We just made a two ply, then simply brushed it with a regular old hairbrush. Nice!

I think that my particular batch of mohair must have come from an older goat because it was pretty coarse and hairlike. Peggy had some nicer, softer mohair, which she explained came from younger animals. Like just about any other animal, its hair gets more coarse as it ages.

Second - we made "two pass boucle" which was easy enough, and really pretty, but really fragile and delicate, as the little boucles slide along the thread.


I can't see knitting with this, as I think that all of the little bumps would get pushed into a giant wad.

Here's how you can do it - spin some mohair, or any other fiber, into a fairly slender single with medium to high twist. On another spindle, start a leader of sewing thread, fine yarn, embroidery floss, or whatever. Tie your single onto the thread, and start spinning your spindle, slowly, in the plying direction - in my case, counterclockwise. Feed out about a foot or two feet's worth and then, slowly, begin to gently push the single down the thread, towards the spindle. Keep pushing, evening it out along the thread and - suddenly - little boucles pop out! Arrange them nicely, then wind on to the spindle, and repeat with another arm's length. Continue until you are all done. It's called "two pass" because the first pass was spinning the mohair, and the second pass is plying it with the thread and making the little boucles.

Third - we made "three pass boucle" and WOW, this came out really nice! The little boucles are held firmly in place, and the yarn is quite stable. Now, this is something I can use!

Here's how - Start from the end of the "here's how" for two pass boucle. On another spindle, attach a leader of something fine - you can use the same stuff you used in the second pass, or you can use something completely different. In my sample, I used some sparkly sewing machine thread, and it came out so cute! Tie the results from the two pass to the new thread and mount on your spindle. Begin the spindle spinning in the original spinning direction and ply the new thread together with the results from the two-pass boucle. Simple as that. The threads from the second and third passes criss-cross over the single and hold the little bubbles in place.

In other words, spin the mohair, ply in the opposite direction, then ply again in the original spinning direction. I'd use the terms "S" and "Z" but I *always* get it backwards, so just figure it out.

The ladies at the wheels did it a tad bit different, but not terribly different. They also did it MUCH faster than I was able to.

Fourth - we learned how to "core spin" so that little curls of mohair stand out from the core of the yarn. I used some Regia sock yarn as my core. I mounted it onto my spindle, and got the spindle spinning *slowly* clockwise (which was unplying the sock yarn), catching the butt end of little clumps of curls onto the yarn. Wind onto the spindle, and repeat until you've done enough.

Then, once I had spun enough, I tied the end of this yarn to a slender binder, much as I did in the three-pass boucle. I mounted this to my spindle and got it spinning counterclockwise, and plied the binder onto the yarn. This step also restores the proper ply to the core yarn, as it got untwisted in the first step. I plied slowly so that the curls could pop out and not get mashed. The result is... interesting... but I can't see that I'll ever actually have a project which calls for something like this, but then, as you know, I have no imagination whatsoever.

**It's important to note that the binder thread, in any of the above projects, can be threaded with beads, which can be fed into place as you are plying the yarn. I simply couldn't figure out how to do this without sprouting a whole 'nother set of arms, so I left it to my Spinning Wheel friends to do that part. The ladies at the wheels were doing a fantastic job of it, and their beaded boucle yarn came out really beautiful!

Peggy helped me realize that it's time to start a spinning binder - how I wish I had done this a long time ago. From now on - you hear me? - from now on, I'm going to keep notes and samples and put them into this binder! Let's just hope that my natural laziness doesn't cause me to drop this project.My daughter gave me this binder. She feels that she's outgrown the multicolored-laser-iridescent design. Funny, I haven't outgrown it at all. How does this work. I think that this is the COOLEST binder ever!

Thanks, Peggy, and Thanks Allie! This was a wonderful class! I learned a lot and best of all, I had a blast.

Go spin some boucle!!!
.
.
.


Felted Slippers - one last time.

.
.
After my last round of making felted slippers, I swore I'd never make them again. It's sooooo foolish to knit a great big item, throw it into the washer and pull out a considerably smaller item, isn't it? Seems backwards, yes?

However, dear darling hubby's slippers quit on him, and I can't stand for my dear darling husband to have cold feet.... soooo....

Another pair is born!  Fiber Trends "Felt Clogs" by Bev Galeskas.
The obligatory "before felting" shot -

In setting up the obligatory "after felting shot," this little cutie pie felt certain that dh's feet were splayed just for her. Or was it the camera? Whichever, she appeared out of nowhere and took her seat, pretty as you please. She's so spoiled.

OK, got her shooed away, and the other little cutie pie showed up. What's with these dogs?

OK, HERE is the obligatory "after felting shot" complete with the pattern for scale. I needle-felted the hearts, and in the process, discovered that needle felting isn't my craft. I'll stick with knitting.

As you can plainly see in the photos, we have hardwood floors, and I didn't want dear darling hubby to slip, so I sewed bits of leather to the bottoms. We have a Tandy store here in town, and it has a scrap bin, so I was able to buy scraps for $2. The two pieces of leather don't match, but dh doesn't care, and neither do I. These pieces were smooth on one side, and suede on the other side - I sewed them suede side out. DH reports that they are super grippy and no worries about slipping. Added bonus - they can be worn for quick trips out into the garage or yard. Looks like they've already taken a couple of these trips, eh?

This is a completely genius pattern. It works up so nicely! And fast, too.


I'd like to share with you a couple of tricks I've discovered, while making oodles of pairs of these clogs. First, make a photo copy. Black out all of the instructions which don't pertain to the size you are making. Careful now, as it's not always easy to tell which parts to mark out until you've read that entire line.

Here, you can see my heavily marked up page. Yes, it's blurred - buy your own pattern!!!

The highlights are to indicate where the pattern shifts from one type of thing to another. See, this pattern is quite repetitive, but not forever. You do the same thing for a number of rows, then you do a special row, then you do a different thing for a number of rows. This is what makes the pattern so completely wonderful. Marking up the pattern makes it much easier to follow, and to remember where the special, shaping rows are.


Next, circle the middle stitches. You can see part of my pattern below. In the upper margin, I wrote the word, middle, and circled it in purple ink. This is to remind me that the parts of the pattern which are circled in purple ink are the middle (middle of the toe) stitches. If you put a stitch marker before and after this middle stitch, then it makes everything so much simpler when it comes to knitting the upper.
See, the pattern will say to knit howevermanystitches, increase, knit some stitches, increase, knit some stitches, then "m1, k1, m1" - the "k1" here is your middle stitch. The first howevermany is a large number of stitches, but the "increase, knit, increase, knit" isn't very many at all, less than 10 in each case.

I don't mind counting up to 10, but I don't want to count the large number, especially if I'm knitting at a coffee shop or something (mistakes!!!), so I count backwards from the middle stitch, and then place a temporary stitch marker. I knit to the temporary marker, then do the middle increases, and so on. Get it?

If you count backwards from the middle stitch, it's so much easier than counting forward from where you are in the knitting. The same goes for the other side of the middle stitch - each row ends with something like "m1, k1, m1, k1." There's no sense in counting out 45 stitches when all you really need to do is to knit up to the last two stitches, then m1 k1 m1 k1. Get it?

This probably makes no sense to those of you who aren't knitting these slippers, but it makes perfect sense when you are knitting! This little trick turns this project from an - Only knit when you have quiet and privacy project - to a - Knit while participating in lively conversation project. Anyway, I find that this little tip makes all the difference.

Also, I've circled the stitch numbers in pencil. It's nice to stop and check every now and then. I've also circled the special rows - more incentive to stop and follow the instructions, rather than just knit and knit...

Once you get your pattern all marked up, put the copy back into the plastic sleeve, behind your original. You'll still want to look at the photos as you are knitting. I move a Post-it Note along the pattern, so I can keep up with which line I'm supposed to be on.

Another hint is that if you goof up the stitch counts, it really doesn't matter - you are going to felt the things! So, just fix the math on the next round and continue on your merry way. If you were supposed to decrease on the knit row, but you forgot, then decrease on the purl row. Honestly, it won't matter in the end, and it makes no sense to rip out when no one will ever know but you, and you'll forget.

When I made my very first pair I followed the directions for knitting the soles, which means that I knitted the soles with a slit up the middle. However, when I knitted all subsequent pairs, I made a significant change in how I make the soles - I do the "turkish cast on" and then knit the soles in one piece, rather than going back and sewing up the seam on the very bottom. I find that this makes it much neater, and for me much easier, in the long run. You have to alternate between knit and purl in order to end up with garter stitch, but I still like it so much better than going back and sewing up the sole.

OK, now, it's official. I'm never making another pair of these slippers, ever again. This time, I mean it. Really.

.
.