If you want to see my past posts about the stretchy cast-on, then please click here for videos, http://rosemaryknits2.blogspot.com/2006/11/best-stretchy-cast-on-ever.html, and here for still pictures, http://rosemaryknits2.blogspot.com/2006/11/best-stretchy-cast-on-ever-continued.html
This is a wonderfully useful cast-on to know. I’m happy to have it in my arsenal of tricks.
This sewn cast-off is not terribly difficult - if you want a REALLY clear understanding of the structure of the cast-on, and the cast-off, then I recommend that you do just what I did – cast-on with two different colors of yarn and then just study it. Watch what is happening as you do the cast-on. Pay attention to what the yarn is doing every step of the way. After you have an understanding of it, then knit a bit with a third color of yarn. You'll say, "Oh, NOW I get it."
Here is a photo of the cast-on --- the cast-on edge is on the top in this photo - with three different colors of yarn. Lavender and white are the actual cast-on stitches, and the green is the knitting which followed. Study these photos carefully and see if you can tell how to work a matching cast-off.


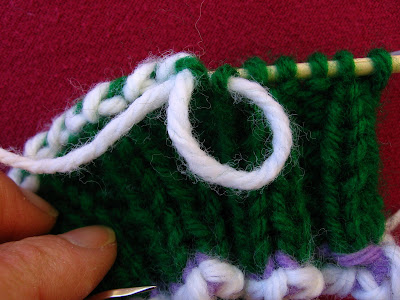
Here, you can see my sewn cast-off in progress. What follows are a million photos of how you can do it, too. Lots of cast-off-seamstresses are worried about taking the stitches off of the needle for the sewing up process, so I'll show it twice - first with the stitch being sewn while still on the needle, and far below, with the stitch taken off of the needle.
 Your first step (photo above) is to go through the left most stitch on the right hand needle coming from the back through to the front of the stitch. This step isn't shown in action, but is indicated by the white yarn coming out of the front of the stitch. The stitch is a little bit twisted, so you'll just have to take my word for it - the white yarn has gone in through the back of the stitch and is coming out through the front of it.
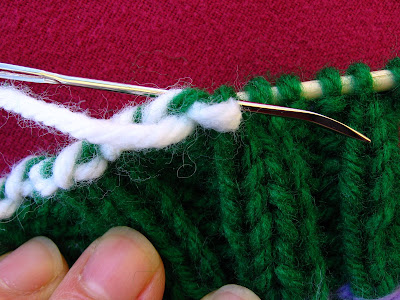
Your next step (photo below) is to stick your tapestry needle into the front of the next stitch on the right.
 Next, through the first stitch, from the back of the stitch -
 Pull the yarn, but not too tightly. Match the tension in the cast-on edge. Note how the yarn is coming from below the loop just sewn? Another way of saying this is to be sure that the yarn is emerging from outside of the loop. If it is above the loop, then it will end up inside of the loop, when the loop is pulled snug. Get it?
 Almost done. One more step to go...
 Now, go through the knit stitch from the back of the stitch, to the front.
 Pull it snug, but not tight.
 Done.
Done. Now, you can take this stitch off of the needle.
~~~~~~~~~~~~~~~~~~~~~~~~~~~
Below, the same procedure, but the stitch being worked has been removed from the needle.


 ~~~~~~~~~~~~~~~~~~~~~~~~~~~~~~~~~~~~~~~~~~~~~~~
(The reason that the knitting needle has a black line on it is because I was teaching a friend how to Magic Loop and she kept getting mixed up. When knitting with the magic loop method, the needle in the right hand is *always* the right hand needle, so I put a mark on the needle in her right hand, so she'd get it.)
This cast-off can be used for articles worked in the round, such as sock cuffs, mitten cuffs and the like, just be sure to sew the last stitch to the first stitch. Lots of knitters cast-off all of their stitches and omit this last step, and it leaves a notch which is annoying and unfinished. This cast-off is the match to the cast-on – very stretchy, but it bounces back quite nicely.
I strongly suggest that you swatch to see how you like it. Also, swatch so that you are casting-off with the right side facing you, and make another swatch where you are casting-off with the wrong side facing you – both are valid techniques, and each one looks a little different from the other, but it makes no difference to the stretchyness. As with most knitting, it will look better after washing and blocking.
Enjoy!


