Best Stretchy Cast OFF ever!

This is a stretchy cast-off which is the exact match to the stretchy cast-on that I blogged about a year or so ago. By the way, there are many different ways to work that cast on - a friend of mine does it in such a way that she ends up with a lacey edging of a row of tiny loops. She rolls her needles in the opposite way that I do, and she picks up the inside thumb strand, rather than the outside strand. It is really pretty! There are lots of variations – experiment and find your own.


If you want to see my past posts about the stretchy cast-on, then please click here for videos, http://rosemaryknits2.blogspot.com/2006/11/best-stretchy-cast-on-ever.html, and here for still pictures, http://rosemaryknits2.blogspot.com/2006/11/best-stretchy-cast-on-ever-continued.html
This is a wonderfully useful cast-on to know. I’m happy to have it in my arsenal of tricks.

This sewn cast-off is not terribly difficult - if you want a REALLY clear understanding of the structure of the cast-on, and the cast-off, then I recommend that you do just what I did – cast-on with two different colors of yarn and then just study it. Watch what is happening as you do the cast-on. Pay attention to what the yarn is doing every step of the way. After you have an understanding of it, then knit a bit with a third color of yarn. You'll say, "Oh, NOW I get it."

Here is a photo of the cast-on --- the cast-on edge is on the top in this photo - with three different colors of yarn. Lavender and white are the actual cast-on stitches, and the green is the knitting which followed. Study these photos carefully and see if you can tell how to work a matching cast-off.


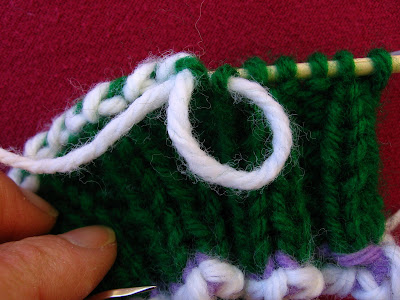
Here, you can see my sewn cast-off in progress. What follows are a million photos of how you can do it, too. Lots of cast-off-seamstresses are worried about taking the stitches off of the needle for the sewing up process, so I'll show it twice - first with the stitch being sewn while still on the needle, and far below, with the stitch taken off of the needle.
Your first step (photo above) is to go through the left most stitch on the right hand needle coming from the back through to the front of the stitch. This step isn't shown in action, but is indicated by the white yarn coming out of the front of the stitch. The stitch is a little bit twisted, so you'll just have to take my word for it - the white yarn has gone in through the back of the stitch and is coming out through the front of it.

Your next step (photo below) is to stick your tapestry needle into the front of the next stitch on the right.
Next, through the first stitch, from the back of the stitch -
Pull the yarn, but not too tightly. Match the tension in the cast-on edge. Note how the yarn is coming from below the loop just sewn? Another way of saying this is to be sure that the yarn is emerging from outside of the loop. If it is above the loop, then it will end up inside of the loop, when the loop is pulled snug. Get it?
Almost done. One more step to go...
Now, go through the knit stitch from the back of the stitch, to the front.
Pull it snug, but not tight.
Done.
Now, you can take this stitch off of the needle.


~~~~~~~~~~~~~~~~~~~~~~~~~~~
Below, the same procedure, but the stitch being worked has been removed from the needle.


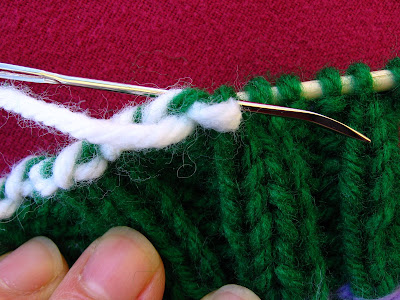
~~~~~~~~~~~~~~~~~~~~~~~~~~~~~~~~~~~~~~~~~~~~~~~

(The reason that the knitting needle has a black line on it is because I was teaching a friend how to Magic Loop and she kept getting mixed up. When knitting with the magic loop method, the needle in the right hand is *always* the right hand needle, so I put a mark on the needle in her right hand, so she'd get it.)

This cast-off can be used for articles worked in the round, such as sock cuffs, mitten cuffs and the like, just be sure to sew the last stitch to the first stitch. Lots of knitters cast-off all of their stitches and omit this last step, and it leaves a notch which is annoying and unfinished. This cast-off is the match to the cast-on – very stretchy, but it bounces back quite nicely.

I strongly suggest that you swatch to see how you like it. Also, swatch so that you are casting-off with the right side facing you, and make another swatch where you are casting-off with the wrong side facing you – both are valid techniques, and each one looks a little different from the other, but it makes no difference to the stretchyness. As with most knitting, it will look better after washing and blocking.

Enjoy!

Even MORE needle felting!

I'm so thrilled with my new trick of needle felting-finishing knitted items, I can't contain myself, I have to tell you all about it.

Here, you can see me needle felting the yarn-end into the brim of a knitted hat. It is worked from the brim to the top - just a plain jane rolled brim. I never know what to do with the tail because a rolled brim doesn't have a right side and a wrong side - both sides are "right side" sides.

In the past, I've worked the tail up into the crown of the hat, but that isn't necessary any more, not since I've figured out this needle felting trick.


With the needle in place, so you can see where the felted bit is located - -
Needle removed - - Gone! This hat is knitted out of Encore, a really nice wool blend. My daughter just loves these hats.

In the series of photos, below, you can see me needle felting a wayward thrum back into place

Before the needle - - see how it pokes out?

During the process - -

After. How nice.
You know, you can do the same thing with pulls or snags - just work the snag to the wrong side of the item and felt it in place.

I'm obsessed.


In order to work with the pokey needles on a mitten, without poking myself or needle felting the mitten closed, I stuffed it with the bags from my onions and oranges.


Unless you give this a try, you'll have no idea how handy this method is for finishing your knitting. Are you put off by the imagined cost of needle-felting needles? Have you checked the price? My LYS sells them for less than a dollar a piece, and for finishing projects, you'll only need one, or two if you should choose to strap them together. These little doozeys are REALLY inexpensive. Try it!

Needle Reassignment Surgery

A while back, I posted a short "teaser" which one of my commenters referred to as "needle reassignment surgery," and I think that this is terribly clever, so this is the term I will use. LOL.

I turned Balenes and Boye interchangeables into circular needles, and some skewers and pick up sticks into straights - and you can, too! It's really quite easy.

First, have a look at my article, to get an understanding of how it all goes together.

What I'm doing here is exactly the same thing, only with plastic Balenes instead of wooden dowels. MUCH to my surprise, it's extremely easy to drill into plastic needles - MUCH easier than drilling into wood. First, plastic is so much softer than wood, and it has no grain. When drilling into wood, the drill bit seems to follow the grain of the wood, and sometimes, come out of the side of the needle, as indicated in the article.

Step one - saw off one pointy end of one of the Balene double points.


Next, drill into the end of the needle - just like you did with the wooden ones, but look how much fun it is to drill into plastic! Twirlies!!!Because I think that these twirlies are just too cute, I'll treat you to another photo, lol. Notice a very important point - twirlies means NO sawdust! A very clean activity! (I made my next pair in the house, at the dining room table...)

Since it is so easy to do, just drill the whole length of the drill bit.


Here is what you end up with - a deep hole.


Next, shape the shoulders of the "hole" and proceed as in the article with notching the Weed Whacker Filament and gluing it into the hole and wrapping with plumber's tape and knitting.
These needles are wonderful - - Very flexible, very nice. These are a Balene size 3. Oh - wait! I had to reshape the tips - see - On top is the original shape, and below it is the reshaped. I just used my Revlon nail file - it only took a few seconds. I really hated the original shape - those little shoulders were annoying. Small changes can make big differences!
One point - when I made mine, I used the same glue that I always use - the Locktite Household Adhesive - and it didn't dry! Now that I think about it, it makes perfect sense - plastic weed whacker filament inside of a plastic hole is just the same as sealing it in plastic, right? But, of course, this didn't occur to me at the time, I just thought that I was being my regular old clever self, lol. When did I make this discovery, you ask? When I was on the road, on our trip to Moab, and of *course* I didn't have any other needles. Sigh. So, I just wrapped the plumber's tape onto the join, really really really tightly, and hoped for the best. Since hoping for the best nearly always worked, it worked for me and while it was decidedly weird to knit with needles which are swiveling around on the cables, it all held together and I knitted a perfectly decent pair of mittens and I didn't even cry or anything, lol.

Now that I've successfully made these circs out of plastic dpns, I'm going to do some plastic surgery (get it? get it?) on a batch of circs which my mom gave me. They are her old ones and they are lovely needles with awful cables and awful joins. Besides, they are *all* way too short for magic loop, so I'm going to repair the whole lot of them.

Now, on to an experiment which didn't work out as well as I had hoped. I've used these for many projects, most recently for knitting a darling little alpaca hat for my dh to wear under his bike helmet, and while they... knit... they annoy me. See, I thought I was being all smart and all and I ground down the join end of the needle, but all this did was to provide a place for the smooth finish to chip off and get all pokey and scratchy.

This was a pair of needles which someone, somewhere along the line, gave to me. They were new in the package - Boye interchangeables - size 2 - no cables, just the needles. So, I chopped off a bit of weed whacker filament, glued it in, and ground down the straight sides to make a smoother join. But, like I said, it isn't completely satisfactory as the finish is now flaking off and poking my yarn and me. Were I to do it again, I'd leave the straight sides as they are, and do a little sculpting with the pipe tape. Also, the pipe tape doesn't adhere very well to the metal, so I'll probably not repeat this experiment. That is, until someone gives me another pair of Boye interchangeables...

See how shallow the hole is? This doesn't inspire confidence. But, I have to say that they've knitted just fine, I'm simply whining.

See how little difference there is between the diameter of the cable and the needle? I should have left well enough alone... You can see little bits of glue in the area of the join. I learned my lesson with the plastic needles, so I used some sort of odd-ball plastic epoxy on these. It worked out just fine.

On rare occasions, I like to use straight needles - always short ones. Here, you see my little collection.

From top to bottom, roughly left to right, you can see a pair of needles which I made out of culinary skewers, a pair of Britanny Birch dpns - reassigned (with a lone Balene in between), a pair of pickup sticks - reassigned, and more culinary skewers. Missing are my most faves, a particularly short pair of wooden dowel needles which are loaned out to a friend. I made the skewers and the dowel pairs in order to knit the blue alpaca neckwarmer which is way down below.

The pickup sticks make great needles! Here are two different boxes, one from the dollar store and one from the Goodwill. The box on top are filled with perfect number 2 needles, which I used, once upon a time, to begin my Heere Be Dragone shawl (must get back to it...) and the box on the bottom holds perfect number 3's. No, the Goodwill didn't mark the box, I did, lol.
I tied the stoppers onto the needles with this "yarn" and it works perfectly. It's way too cute, too - a nice, bright greenish yellow.
Making needles out of dowels is easy - just do it. You can finish them or not, you decide. The skewers, on the other hand, are a pain in the neck. I ended up soaking them in Formby's oil finish, then letting them dry, then steelwooling them and yes, they came out FANTASTIC, and are wonderful to use, but way too labor intensive for me. I had to do this because the skewers are quite splintery, and unusable in their au naturale form.

Next up - more adventures with needle-felted finishing techniques!

Ugly Scarf and its Cute Sister

You know.... maybe Annette's right, maybe this is the butt-ugliest scarf ever knitted... but I tell you, it was great fun to knit! A little of this, a little of that, all garter stitch and with that new favorite finishing technique - needle felting - Well, I like it. The Kid for whom it was knitted likes it too, according to the Kid's mother, and so I'm happy with the whole project. Easy.... relaxing.... fun textures.... fun colors.... a very enjoyable project from start to finish.
This was knitted for the Kid's Older sister, and while it came out cute, really cute, it was a complete pain in the ass to knit and I'll never knit another one as long as I live because I nearly lost my mind. However, should you be silly enough to knit one, here's how - cast on 250 with a size 5 knit pick set which are mounted on 60 inch cables with buttons. What I mean is that each needle should be on it's own, separate cable with a button on the end of the cable - you know, super long "flex needles."

I used the cable cast on with great success, and I highly recommend it for this project. You'll need the strength that this particular cast on provides.
So, you cast on, then turn and knit back, increasing one stitch for every stitch knitted. I did the EZ backwards e increase. Turn, purl all the way back across. Turn and knit, increasing one for each knitted stitch, purl back, another increase row, purl back, knit without increasing, purl back, then cast off right before you set your hair on fire and run down the street screaming.

I did the regular old cast off where you knit two stitches, then pass the first one over the second one, knit, pass, and etc, with one little change - you know how you are always scolded to "cast off loosely?" Well, in this case, cast off TIGHTLY, and it will make the edge roll even more than usual which adds to the cuteness of the whole thing.

So, you begin with 250, and immediately increase to 500. Purl 500 stitches. Knit, increasing to 1000, purl 1000. Knit, increasing to 2000, purl 2000. Knit 2000, purl 2000, cast off 2000 stitches and ask yourself was it worth it??? All the while, you are fighting with the stupid thing because the "spine" is soooooooo much shorter than the outer rows... grrrr. I've never come so close to sticking my needles in my eyes out of desperation in my whole knitterly life!!!

Anyway, it did indeed come out very cute. It reminds me of lettuce, lol.

Needle Felted Finishing technique - try it!

As you know, I really like knitting with alpaca. Just love it. Alpaca has many many fine qualities which make it the superlative knitting yarn, but for one teensy little drawback - alpaca is very slippery. This is what makes it have such a wonderful "hand" but it makes it difficult when it comes to finishing your project, as the woven-in-tails don't stay put. Of course, when they worm their way out, they always poke out to the right side, don't they? So... I decided to figure this out once and for all.

This is what I came up with. Do you see my yarn tail? Look really closely on the purl part of the k2p2 rib in Grace's Dalmatian mittens. I've turned the cuff back just a bit, because, of course, she's hidden the tail on the inside of the cuff. See it?

Here is the worked-in-tail on another pair of alpaca mittens. Look at the ridge which runs right through the center of the photo. See it?
Here is the inside of a pair of striped alpaca thrummed mittens. Hooo wee, what a lot of tails were in *this* pair of mittens, with all of those stripes. Do you see all of the tails? Look closely...
Here, I've pricked one out with the knitting needle - see it now?
I've solved my "ends" problem very simply - I've needle felted in the ends! Soooooo simple, soooooooo effective. Really - try it!

Here is a quick demonstration - I'm showing you on a worked-in-end which has already been worked-in, but you can figure out the details. First, you weave the tail in over a few stitches in your favorite way - I generally duplicate stitch if it's thin yarn - and then you lay the yarn across a stitch which you think will be suitable for this method - a rib works well, or a purl bump.

Then, just poke away with your needle felting needle.
Just poke poke poke, from one direction, then from the other, until the yarn begins to snag the yarn below it. This particular alpaca yarn is sooooo slick that it was hard to get it to "start" but once the felting process began, then it sort of snowballed. This whole process takes something like 10-15 seconds, so I'm not talking about all afternoon here, lol.

Once the yarn began to felt to the yarn below, I clipped the yarn and continued to needle felt on the clipped end, and it felted beautifully. As you can see, in the photo above, I kept my needle felting action completely on the wrong side of the mitten. In other words, I didn't poke through from one side of the mitten (wrong side) to the other side (right side) but kept the needle on the wrong side at all times. In this way, the right side looks like perfectly plain knitting with none of the "rats nest" appearance that you can see on the wrong side.
It leaves a soft little tangled and matted area which is not the least bit "lumpy," but just a little felted area. It holds the ends down VERY nicely! The ends are secured, and all is right in the world.

Now, I use it on *ALL* of my knitting. I just finished two acrylic scarves and I successfully needle felted the ends on those too. I couldn't believe it, but they felted just great! One was a scrap scarf - great way to use up stash, even if my friend, Annette, says that this is the ugliest piece of knitting that she's ever seen in her whole entire life - I had fun knitting it just the same. It's for a KID and I hope that this kid likes it, even if Annette has no taste whatsoever...

I also finished a superwash merino scarf, and needle felted the tails (even though superwash isn't supposed to felt!), and another scarf out of a wool/silk blend, and it felted beautifully, too. The photos at the start of this post are on the insides of the mittens, so I really didn't pay much attention to the "beauty" of the needle felted business, but with scarves, of course, both sides have to look nice. It is really pretty easy to do it neatly and prettily and in such a way that the felted down end doesn't show AT ALL. I'm telling you - try it, you'll like it!

Anyway, I digress.

Below, you can see one needle felting needle, and below that, you can see two of them, duct taped together. Actually, I always use them this way - two of them, taped together. Twice the felting power, half the time, and all that.

See those little barbs along the length of the needle? (Click the photo for a larger version) You will probably, at some point, jab yourself, but let me tell you - you'll only do it ONCE. It hurts more than you could ever dream possible, so you are not likely to repeat that little trick.

My friend, Allie, taught me a much better way of holding two needle felting needles together - you clip a short bit (1 inch? 1.5 inch?) of one of those double, plastic, coffee shop coffee stirrers - and you stick one needle down one side, and the other needle down the other side. I tried it, and it works beautifully. Since the needles are fatter than the coffee stirrer, you really have to jam them down in there, but once they are stuck in there, they are stuck for the duration.


It also keeps the needles parallel so you don't get the crossed tips as you see in the photo.

If you can't find felting needles in your area, then contact my LYS at Colorado Fiber Arts and they'll fix you up with what you need. (You'll also see that I'm teaching two classes - thrummed mittens and swirly blanket/shawl, but I'm not "named" as the teacher.)

Like I said, I've used this technique on alpaca and it works great. I've used it on pure, unadulterated acrylic (Simply Soft, Home Spun, Eyelash, Red Heart, and more!) and shock of all shocks, but it works with that, too. I still can't believe that I was able to felt acrylic, but I did.

Years ago, when I began knitting, and we didn't have a wonderful local yarn store, and I had to do all of my yarn shopping at big box stores, and acrylic was all I could find, I used to hand sew the ends down. Yup - with a bit of sewing thread. That Simply Soft is actually pretty decent acrylic yarn, but the ends just don't stay put. One of my first "big projects" was a tropical colored poncho for my daughter, Emma. I sewed down each and every one of 10 million yarn tails and nearly lost my mind. How I wish I had learned this little trick back then!

Now, I know the secret to well-behaved yarn ends, and you do, too!

Enjoy!