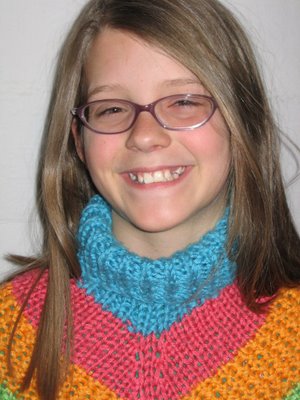
Remember this post - Poncho Fever? One of my pals asked for directions, so here they are! First, admire the smiling poncho wearer…
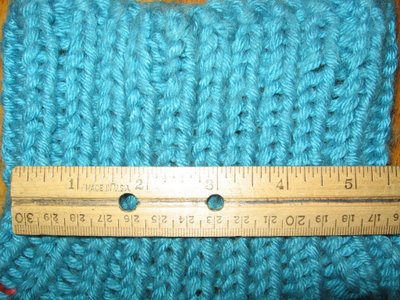
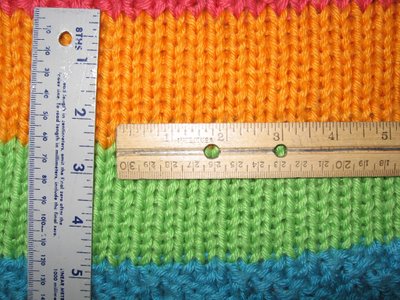
OK, now we’re ready! This poncho is knitted from the neck to the bottom. I used Caron’s Simply Soft in their “Brights” line of colors, and I held two yarns together as I knitted. I think that I used #10 needles, but they might have been larger. Since I make my own needles, I am not really sure of the size. So – Swatch! If you click on the photos, you can see a larger version, and the ruler markings will be apparent.
With the yarn held double, I got 13 stitches, and about 21 rows, over 5 inches in stockinette, and about 19 stitches over 5 inches in k1p1 rib.
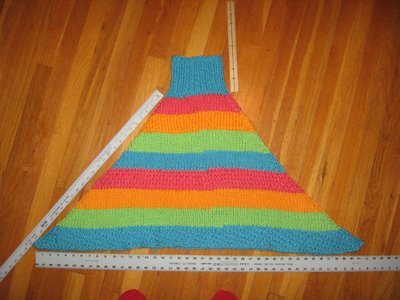
This poncho fits my 10 year old daughter. She’s a tall one at 5’2” but is a skinny gal at 80 pounds. I tell you this so that you can have some idea of the size.
Cast on 42 stitches. When I made this poncho, I used the Cable Cast On, which is a lovely cast on, but in the meantime, I discovered the best cast on ever. It can be found on page 132 of the Principles of Knitting – the Double-Needle Cast on. Since it’s copyrighted, I can’t duplicate the instructions here, but it involves a long-tail cast on, two needles and a twist. It’s the BEST EVER so trot on down to your local library, find the book, and learn it for yourself. I’ll never use another cast on for as long as I live. Even though it is quite complex, it is the only cast on that I teach to my newbie-knitter friends. It works with every stitch pattern there is. It stretches sooooooo nicely. Learn it.
OK, I digress. Cast on 42 stitches, and k1p1 until the neck is as long as you like it. If you do only a couple of inches, you won’t get this turtle neck effect, but it will lie flat. Emma’s poncho has a 5 inch neck.
Switch to straight stockinette, and knit one round. (On Emma’s Poncho, I changed color here, and changed colors every 10 rows.) From now until the very end of the poncho, you will increase at opposite sides of the poncho (front and back), and you will increase 4 stitches, every other round. Here’s the easy way – put a stitch marker on either side of stitch #1, and on stitch #22 - - but this is a special stitch marker – it is a “red light green light” stitch marker, that my darling daughter Grace invented. Make a loop of red yarn, plenty large enough for your large needle to pass through. Tie a loop of green yarn in this loop, so that the two yarn loops are united as in a chain. Now, put the green loop in front of stitch #1, knit stitch #1, put the other marker, then knit around to stitch #22, and put the markers in front and and in back of the stitch. Knit around, and when you get to the marker at #1, increase one stitch, pass the marker, but pick up the RED loop, knit the stitch, increase, pass the marker and so on. Now, next time you come around to stitch #1, you will see that the red loop is on the left needle. This means “stop!” or don’t increase. Pass the markers, picking up the green loop. Knit around. When you come around to the green marker again, it means “go!” or increase on this round. This will make sense if you just do it, lol. When you get to the red marker, pass it to the green and keep knitting. When you get to the green marker, increase, pass the marker to the red side, knit the marked stitch, pass the marker, increase and go to the other side. Get it? You must keep the marker on either side of the marked stitch – don’t let the increases happen between the marker and the marked stitch. Trust me, this will all make sense when you do it. Friends of mine who have knitted since forever are now fans of Grace’s Red Light Green Light. Anyway, back to your knitting…. Increase every other round, on either side of the center back and the center front stitch until the poncho is long enough, then bind off. You are increasing 4 stitches, every other round. You must put the increase stitches into the bind off row too, otherwise, it will pucker at the bottom. That’s it! Voila! Done!
I’ve included photographic evidence of yet another of life’s little knitting lessons…. When changing colors, and when knitting in patterns, one must knit the first row in all stockinette, otherwise you get THIS - -
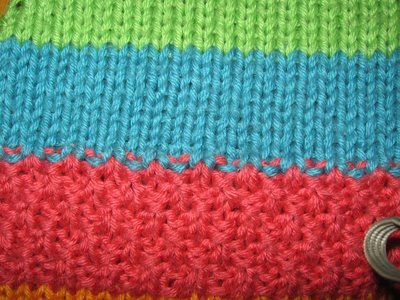
Instead of this - -
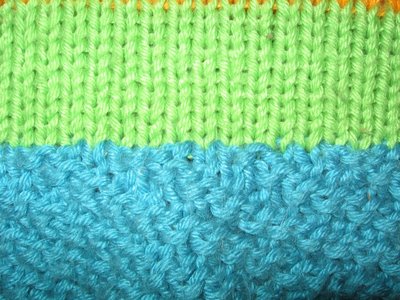
These pictures are upside-down to the direction of knitting, but this is how it lies on the wearer. In the top pic, you see that I knitted a blue stripe in stockinette, then switched to red seed stitch. See that oh-so-not-lovely dot and dash thing going on here? It annoys me every time I see the child wear the poncho, lol. See the bottom picture? How well behaved that color transition is? I knitted the first row of the blue in stockinette, even though I fully planned on knitting in another variant of seed stitch. Lesson learned…..
Taught by Swatches
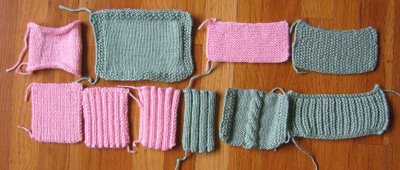
When I started knitting, I was much more interested in how knitting worked, than I was in actually knitting a project. One of the very first things I did was to knit up these little swatches. How smart I was to do this *first* because it gave me a great understanding of how the basic knit stitches behave. In the first picture, you can see the swatches in the order in which they were knitted. All were knitted on the same needles (US5, I think), and with the same yarn, Caron’s Simply Soft. This was an excellent learning experience, and I highly recommend that other beginners do the same.
All of these swatches are 30 stitches across and 30 rows deep. I wanted to do the same number of stitches across as the number of rows so that I’d knit a square. Well… the very first lesson learned was that knit stitches are rectangles and not squares, as witnessed by the first swatch, the pink curly number, which is clearly a rectangle. Lesson number two was that plain stockinette curls one way at the sides, and the other way at the top and the bottom. I knitted another swatch, this time with a seed stitch border all around, so that it would lie flat. The stockinette portion is still 30 stitches across by 30 rows deep with the border added, so that the swatch is now something like 38 stitches across by 40 rows deep. I couldn’t get over how different the two swatches were – the pink one is so unruly, and the green one is so well behaved. The only difference is the border – lesson number three – stitch patterns affect the behavior of their neighbors!
Next, I knitted a swatch of garter stitch – 30 stitches across by 30 rows deep. What a difference! As you can see in the picture with the garter swatch on top of the stockinette swatch, the garter stitch one is much shorter and a tad bit wider than the stockinette one. Also, it is quite evident, even from this small swatch, that stitch patterns “feel” different – this garter stitch swatch is very floppy and drapey – much more so than the stockinette swatches.
Next – seed stitch – wider still than the garter swatch, and taller too, but still not as tall as the stockinette swatch. Not as floppy as the garter stitch, either.
Next, I studied how the different rib stitches work. As you can see, all of the rib stitches are taller than the stockinette swatch, and *much* narrower. Of course, I knew from an entire life of wearing sweaters with ribbed cuffs, that rib stitch would be narrower than the corresponding stockinette, but I was completely surprised that the rib knit was also taller! The swatches start with a k1p1 rib, and continue to a k4p4 rib.
My final swatches involved specialty stitches – one swatch of Shaker knitting, from Katharina Buss’s Big Book of Knitting, and the other swatch with a simple cable. The Shaker knitting swatch is quite interesting – I knitted it on the same needles as the other swatches, but look at how much larger the stitches are! One would think that I used a larger needle, yes? But, I didn’t. It is how the stitch pattern is made – it involves knitting into the row below, and the row above it sort of comes undone. If you count the rows, it appears that there are only 15 rows deep, but there are actually 30 – this is simply how the stitch pattern works. The result is a very three-dimensional stitch pattern, which is very loosey goosey and sort of floppy. I don’t particularly like it in Simply Soft, but I bet that it would be awesome in wool, and with better attention paid to needle size.
My last swatch is a cable – the seed stitch borders are in addition to the 30 cross-wise stitches. Just *look* at how much lateral space is taken up with a cable! That one cable takes in as much, laterally, as a k1p1 rib, all the way across! I was amazed. Imagine how many stitches one would have to cast on in order to have a man’s sweater with cables all the way across!
If you are just starting out, I urge you to do a little swatching – you will *really* understand the architecture of knitting, and you will understand the reasons why some things work and won’t work. Also, in my little swatch lesson, I practiced different binding on and binding off methods, and I urge you to do the same.